chris
Mastering Your Tune: A Comprehensive Guide to Fender Tuners
Introduction:
In the world of music, precision is paramount. Whether you’re strumming a guitar, plucking a bass, or picking a ukulele, achieving the perfect pitch is essential for creating harmonious melodies. This is where a reliable tuner comes into play, and when it comes to quality tuners, Fender stands as a beacon of excellence.
Fender tuners are renowned for their accuracy, ease of use, and versatility, catering to the needs of musicians across various genres and skill levels. In this comprehensive guide, we’ll delve into the world of Fender tuners, exploring their features, benefits, and usage tips to help you master your tune with confidence.
Quick Tips for Tuning Success:
- Tune Regularly: Make tuning a regular part of your practice routine to ensure your instrument always sounds its best.
- Start with a Stable Environment: Find a quiet space with minimal distractions to tune your instrument effectively.
- Check Intonation: Don’t just tune open strings; ensure each fretted note is in tune to maintain proper intonation.
- Use Consistent Pressure: Apply consistent pressure when fretting notes to achieve accurate tuning results.
- Trust Your Ears: While tuners provide precise measurements, trust your ears and fine-tune manually for optimal results.
- Replace Batteries Regularly: If using a battery-powered tuner, replace batteries periodically to avoid unexpected interruptions during tuning sessions.
-
Understanding Fender Tuners:
When it comes to tuning your instrument, precision is key. Fender tuners offer unparalleled accuracy, ensuring your instrument is perfectly tuned for every performance. Available in various models including clip-on, pedal, and handheld options, Fender tuners cater to the diverse needs of musicians.
-
Features of Fender Tuners:
Fender tuners boast an array of features designed to enhance your tuning experience. From high-definition displays to chromatic tuning modes, here are some key features you can expect from Fender tuners:
- Accuracy and Precision: Fender tuners deliver precise tuning measurements, ensuring your instrument is perfectly in tune.
- Versatility: With support for various tuning modes including chromatic, guitar, bass, and ukulele, Fender tuners accommodate a wide range of instruments.
- Display Options: Whether you prefer LED, LCD, or color-coded displays, Fender tuners offer visibility in any lighting conditions.
- Durability: Built to withstand the rigors of live performances, Fender tuners are constructed from durable materials, ensuring long-lasting reliability.
- Battery Life: Enjoy extended tuning sessions with Fender tuners’ efficient battery life, allowing you to tune with confidence wherever you go.
III. Advantages of Using Fender Tuners:
Choosing a Fender tuner offers numerous advantages for musicians:
- Reliability: Trust in Fender’s reputation for reliability and precision tuning.
- Ease of Use: Enjoy intuitive operation and hassle-free tuning with Fender tuners.
- Compatibility: Whether you’re a guitarist, bassist, or ukulele player, Fender tuners support a wide range of instruments.
- Portability: Take your tuner on the go with compact and lightweight designs ideal for travel.
- Value for Money: Invest in a quality tuner that offers superior performance and durability.
-
How to Use Fender Tuners:
Mastering your tune is easy with Fender tuners. Follow these simple steps to achieve perfect pitch:
- Choose the Right Tuner: Select the appropriate Fender tuner for your instrument and preferences.
- Power On: Turn on your Fender tuner and ensure it’s ready for use.
- Select Tuning Mode: Choose the desired tuning mode based on your instrument.
- Clip On or Connect: Attach the tuner securely to your instrument or connect it via cable, depending on the model.
- Tune Up: Play each string and adjust the tuning until the indicator shows the correct pitch.
- Fine-Tune: Fine-tune manually using the tuner’s display or your ears for optimal results.
- Repeat: Tune each string individually, ensuring all strings are perfectly in tune.
- Power Off: Turn off your Fender tuner to conserve battery life for future use.
-
Comparison with Other Tuners:
While there are many tuners on the market, Fender tuners stand out for their superior performance and reliability. Here’s how Fender tuners compare to other leading brands:
- TC Electronic: Fender tuners offer comparable accuracy and reliability at a competitive price point.
- Korg: With a focus on versatility and ease of use, Fender tuners provide a user-friendly tuning experience for musicians of all skill levels.
- Boss: While Boss tuners are known for their durability, Fender tuners offer similar durability with added versatility and precision tuning capabilities.
-
User Experiences and Reviews:
Don’t just take our word for it; hear what musicians have to say about Fender tuners:
- “I’ve been using Fender tuners for years, and they’ve never let me down. Accurate, reliable, and easy to use – everything I need in a tuner.” – Sarah, Guitarist
- “As a bass player, tuning is crucial for locking in with the band. Fender tuners give me the confidence to perform at my best every time.” – Mike, Bassist
- “I recently switched to a Fender tuner, and I’m blown away by the accuracy and versatility. It’s become an essential part of my pedalboard setup.” – John, Guitarist
Table of Things You Can Purchase with Prices:
| Item | Description | Price |
| Fender Clip-On Tuner | Compact tuner that clips onto | $19.99 |
| the headstock of your instrument | ||
| Fender Pedal Tuner | Stompbox tuner with bright LED display | $79.99 |
| for easy visibility on stage | ||
| Fender Handheld Tuner | Handheld tuner with chromatic tuning | $49.99 |
| modes and built-in microphone |
Prices are approximate and may vary based on retailer and location.
Conclusion:
In the pursuit of musical excellence, every note matters. With Fender tuners, you can achieve perfect pitch with ease and confidence. Whether you’re jamming at home or performing on stage, trust in Fender’s legacy of quality and innovation to master your tune like never before.
With a Fender tuner by your side, you can tune with confidence and focus on what matters most – making music. Choose Fender and master your tune today!
Exploring the Best Acoustic Guitar: A Deep Dive into Strandberg’s Innovative Offerings
Introduction
In the world of music, the acoustic guitar holds a special place, revered for its timeless charm and versatility across genres. Whether you’re strumming folk tunes by a campfire or delivering soul-stirring melodies on stage, the acoustic guitar remains an indispensable companion for musicians worldwide.
However, in recent years, a new player has emerged in the acoustic guitar scene, challenging conventions and pushing the boundaries of design and innovation. Enter Strandberg, a renowned brand synonymous with cutting-edge craftsmanship and ergonomic excellence.
In this article, we delve into the realm of Strandberg’s acoustic guitars, exploring their unique features, comparing them with traditional counterparts, and uncovering the insights shared by professional musicians and dedicated users alike.
From the origins of Strandberg to the intricacies of their design philosophy, join us on a journey to discover the best acoustic guitar Strandberg has to offer.
Quick Tips for Choosing the Best Acoustic Guitar:
- Define Your Budget: Determine how much you’re willing to invest in your acoustic guitar, considering both the initial purchase price and potential long-term maintenance costs.
- Consider Your Playing Style: Whether you’re a fingerstyle virtuoso or a strummer extraordinaire, choose a guitar that complements your playing technique and musical preferences.
- Test Drive Before Buying: Whenever possible, visit a music store to test out different guitars, paying close attention to factors such as comfort, sound quality, and overall feel.
- Research Brand Reputation: Look into the reputation and track record of the brand you’re considering, including factors like build quality, customer service, and resale value.
- Read Reviews and Seek Recommendations: Take advantage of online resources, user reviews, and recommendations from fellow musicians to gather insights and make an informed decision.
Now, let’s dive deeper into the world of Strandberg’s acoustic guitars.
History of Strandberg Guitars
Strandberg’s journey into the realm of acoustic guitars is a testament to their unwavering commitment to innovation and craftsmanship. Founded by visionary luthier Ola Strandberg, the company initially gained prominence for its groundbreaking electric guitars, celebrated for their ergonomic design and revolutionary features.
However, Ola’s passion for pushing boundaries and challenging conventions soon led Strandberg into uncharted territory—the world of acoustic guitars. Drawing upon years of experience and a keen understanding of musicians’ needs, Ola and his team set out to redefine what an acoustic guitar could be.
Features of the Best Acoustic Guitar Strandberg
What sets the best acoustic guitar from Strandberg apart from the competition? Let’s explore some key features that make these instruments truly exceptional:
- Innovative Body Design: One glance at a Strandberg acoustic guitar, and you’ll notice something strikingly different—their ergonomic body design. Crafted with precision and attention to detail, these guitars boast a unique shape that not only enhances comfort during extended playing sessions but also contributes to improved resonance and projection.
- Premium Materials: From the finest tonewoods to high-quality hardware, every component of a Strandberg acoustic guitar is meticulously selected for its sonic properties and durability. Whether it’s the resonance of a solid spruce top or the stability of carbon fiber reinforcement, these guitars are built to deliver uncompromising performance.
- Next-Level Playability: Strandberg’s commitment to ergonomics extends beyond just the body shape. With their innovative neck profiles and cutting-edge fretboard designs, these guitars offer a playing experience like no other. Whether you’re navigating intricate chord progressions or unleashing blistering solos, you’ll find that every note rings out with clarity and precision.
- Versatile Sound Palette: While some acoustic guitars are known for excelling in specific genres or playing styles, Strandberg guitars are designed to be versatile workhorses. Whether you prefer the warm, mellow tones of fingerstyle folk or the bright, punchy sound of strummed chords, these guitars can adapt to your musical vision with ease.
Comparison with Traditional Acoustic Guitars
How do Strandberg acoustic guitars stack up against their traditional counterparts? Let’s take a closer look at some key differences and advantages:
- Ergonomics and Comfort: Traditional acoustic guitars, while beloved for their classic designs, can sometimes be cumbersome to play for extended periods. In contrast, Strandberg guitars are engineered with ergonomics in mind, offering a more comfortable playing experience that reduces strain and fatigue.
- Playability and Accessibility: Thanks to their innovative neck profiles and fretboard designs, Strandberg guitars often boast superior playability compared to traditional acoustics. Whether you have smaller hands or simply prefer a slimmer neck profile, you’ll find that these guitars offer a more accessible playing experience for musicians of all skill levels.
- Sound Characteristics: While traditional acoustic guitars have a rich, storied history and a timeless sound, Strandberg guitars bring a modern twist to the table. With their innovative body shapes and construction techniques, these guitars offer a unique sonic signature that’s both dynamic and expressive.
User Experience and Reviews
What do musicians have to say about Strandberg acoustic guitars? Let’s hear from both professional players and dedicated users:
“As a touring musician, comfort and playability are paramount for me, which is why I swear by my Strandberg acoustic. Whether I’m performing on stage or writing new songs in the studio, this guitar never disappoints.” – Sarah, Singer-Songwriter
“I’ve been playing acoustic guitar for over two decades, and I’ve never come across anything quite like a Strandberg. The ergonomic design, impeccable craftsmanship, and versatile tone make it a joy to play in any musical setting.” – Alex, Guitar Enthusiast
Availability and Pricing
Interested in purchasing a Strandberg acoustic guitar? Here’s a breakdown of available models and pricing options:
| Model | Description | Price |
| Strandberg Boden 8 | Premium acoustic-electric guitar with ergonomic design and versatile tone options | $2,499 |
| Strandberg Salen 6 | Entry-level acoustic guitar with solid spruce top and comfortable neck profile | $899 |
| Strandberg Boden 10 | Flagship acoustic guitar featuring premium tonewoods and advanced electronics | $3,999 |
Conclusion
In conclusion, Strandberg’s foray into the world of acoustic guitars has yielded remarkable results, offering musicians a blend of innovation, craftsmanship, and sonic excellence. Whether you’re drawn to their ergonomic designs, versatile sound palette, or next-level playability, there’s no denying the appeal of the best acoustic guitar Strandberg has to offer.
So why settle for ordinary when you can experience extraordinary? Explore the world of Strandberg acoustic guitars and elevate your musical journey to new heights.
Mastering Guitar Maintenance: The Essential Guide to Guitar Clamps
Introduction
Maintaining your guitar is crucial for ensuring its longevity and optimal performance. Whether you’re a seasoned guitarist or just starting, having the right tools is essential for proper care and maintenance.
Among these tools, guitar clamps play a vital role in various repair and adjustment tasks. In this comprehensive guide, we’ll explore everything you need to know about guitar clamps, from their types and usage to tips for choosing the right one and DIY alternatives.
Quick Tips for Guitar Clamp Users
Before delving into the details, here are some quick tips to keep in mind when using guitar clamps:
- Safety First: Always wear protective gear like gloves and safety goggles when working with guitar clamps, especially when using adhesives or performing repairs.
- Precision is Key: Take your time to properly position the clamp for the task at hand. Even pressure distribution is crucial for successful repairs and adjustments.
- Check Compatibility: Ensure that the guitar clamp you choose is compatible with your guitar type and size to avoid any potential damage or misalignment.
- Practice Patience: Allow sufficient time for glue or adhesive to dry completely before removing the clamp to prevent any premature failure or damage to the repair work.
- Regular Maintenance: Incorporate guitar clamp maintenance into your routine to prolong their lifespan and ensure consistent performance.
Now, let’s dive deeper into the world of guitar clamps and explore their significance in guitar maintenance and repair.
Guitar clamps come in various types, each designed for specific tasks and applications. Understanding the different types can help you choose the right one for your needs. Here are some common types of guitar clamps:
- Neck Support Clamps: These clamps provide support to the neck of the guitar during repairs or adjustments, such as truss rod adjustments or fretwork.
- Soundhole Clamps: As the name suggests, these clamps are designed to fit through the soundhole of an acoustic guitar, allowing for precise positioning during repairs involving the interior of the instrument.
- Bridge Clamps: Used for securing the bridge in place during glue-ups or repairs, bridge clamps ensure proper alignment and stability.
- Fretboard Clamps: These clamps are specifically designed for tasks involving the fretboard, such as fret replacement or leveling.
Each type of clamp serves a specific purpose and having a variety of clamps in your toolkit can greatly enhance your ability to perform various maintenance and repair tasks with precision and ease.
How Guitar Clamps are Used
Using guitar clamps effectively requires proper technique and an understanding of their functionality. Here’s a step-by-step guide on how to use guitar clamps for common maintenance and repair tasks:
- Neck Adjustments: To perform truss rod adjustments or neck resets, place a neck support clamp securely under the neck of the guitar to provide stability and prevent any damage to the instrument.
- Crack Repairs: When repairing cracks or splits in the body of the guitar, use clamps to apply even pressure along the length of the crack while the adhesive dries. Ensure that the clamps are positioned to close the gap without causing any further damage.
- Gluing and Clamping Braces: For repairs involving bracing inside the guitar body, use soundhole clamps or specialized brace clamps to hold the braces in place while the glue sets.
- Bridge Repairs: When regluing a loose bridge or replacing a bridge entirely, bridge clamps are essential for holding the bridge in the correct position while the adhesive cures.
Safety precautions should always be observed when using guitar clamps, especially when applying pressure to delicate parts of the instrument. Take care to avoid over-tightening the clamps, which could potentially cause damage to the guitar.
Importance of Guitar Clamps in Guitar Maintenance
Guitar clamps play a crucial role in maintaining the structural integrity and stability of the instrument. By providing support and even pressure during repairs and adjustments, clamps help ensure that the work is performed accurately and safely.
Without proper clamping, repairs such as crack sealing or bridge regluing may not hold up over time, leading to further damage and compromise of the instrument’s sound quality.
Furthermore, guitar clamps enable precise adjustments and setups, allowing guitarists to achieve their desired playing feel and sound. Whether it’s adjusting the neck relief, leveling frets, or securing components in place, having the right clamps can make the difference between a successful repair and a botched job.
Factors to Consider When Choosing a Guitar Clamp
When selecting a guitar clamp, there are several factors to consider to ensure that it meets your specific needs and preferences:
- Material and Build Quality: Look for clamps made from durable materials such as aluminum or steel, with sturdy construction to withstand the rigors of guitar repair work.
- Compatibility: Ensure that the clamp is compatible with your guitar type and size, especially if you own multiple guitars with different specifications.
- Versatility and Adjustability: Opt for clamps that offer versatility and adjustability to accommodate a wide range of repair tasks and guitar configurations.
- User Reviews and Recommendations: Take into account feedback from other guitarists and professionals to gauge the performance and reliability of the clamp in real-world scenarios.
By considering these factors, you can make an informed decision and choose a guitar clamp that suits your specific requirements and budget.
DIY Guitar Clamp Solutions
For those on a budget or looking for a creative challenge, DIY guitar clamp solutions offer a cost-effective alternative to commercially available clamps. With some basic tools and materials, you can create makeshift clamps for various repair and maintenance tasks. Here’s a simple DIY guide to creating your guitar clamp:
Materials:
- Wooden blocks or dowels
- Screws or bolts
- Felt pads or rubber tubing (for padding)
Tools:
- Saw
- Drill
- Screwdriver or wrench
Instructions:
- Cut the wooden blocks or dowels to the desired length, ensuring that they are slightly longer than the width of the guitar body or neck.
- Drill holes through the center of each block to accommodate the screws or bolts.
- Attach felt pads or rubber tubing to the contact surfaces of the blocks to prevent scratching or damage to the guitar.
- Position the blocks on either side of the guitar body or neck, aligning them to apply even pressure during repairs or adjustments.
- Secure the blocks in place using screws or bolts, making sure to tighten them sufficiently to hold the guitar in position without causing any damage.
While DIY guitar clamps may not offer the same level of precision or convenience as commercial clamps, they can be effective for basic repair tasks and serve as a budget-friendly option for hobbyists and DIY enthusiasts.
Tips for Caring for Guitar Clamps
Proper maintenance is key to ensuring the longevity and performance of your guitar clamps. Here are some tips to keep them in top condition:
- Clean Regularly: Remove any debris or adhesive residue from the clamps after each use to prevent buildup and corrosion.
- Inspect for Damage: Periodically check the clamps for any signs of wear or damage, such as bent screws or cracked components, and replace them as needed.
- Store Properly: Store the clamps in a dry, climate-controlled environment away from direct sunlight and moisture to prevent rust or deterioration.
- Lubricate Moving Parts: Apply a small amount of lubricant to the moving parts of the clamps to keep them operating smoothly and prevent binding.
By incorporating these maintenance practices into your routine, you can prolong the lifespan of your guitar clamps and ensure reliable performance for years to come.
Table of Recommended Guitar Maintenance Products
| Product | Description | Price |
| Guitar Neck Support Clamp | Provides support during neck adjustments and repairs | $25 – $50 |
| Soundhole Clamp | For precise positioning during interior repairs | $20 – $40 |
| Bridge Clamp | Secures bridges during glue-ups or replacements | $30 – $60 |
| Fretboard Clamp | Ideal for fretwork and fretboard repairs | $15 – $30 |
| Guitar Repair Kit | Includes various tools and clamps for comprehensive repairs | $50 – $100 |
| DIY Clamp Materials | Wooden blocks, screws, and padding materials for homemade clamps | Varies |
Prices may vary depending on the brand, quality, and seller. Be sure to read product reviews and specifications before making a purchase.
In conclusion, investing in quality guitar clamps and maintenance products is essential for preserving the integrity and playability of your instrument.
Whether you’re performing routine adjustments or tackling more extensive repairs, having the right tools at your disposal can make the process smoother and more rewarding.
So equip yourself with the necessary clamps, hone your skills, and enjoy the satisfaction of keeping your guitar in top-notch condition for years to come.
Conclusion
Guitar clamps are indispensable tools for guitar maintenance and repair, enabling precision adjustments and secure repairs with ease. Whether you’re a professional luthier or a DIY enthusiast, having the right clamps in your toolkit can make all the difference in the quality and longevity of your instrument.
By understanding the different types of clamps, their usage, and factors to consider when choosing one, you can confidently tackle any repair or maintenance task and keep your guitar in optimal playing condition. So invest in quality clamps, hone your skills, and enjoy the satisfaction of maintaining your guitar with precision and care
The Complete Guide to Guitar Cases: Protecting Your Instrument in Style
Introduction
Guitar cases are an essential accessory for any guitarist, providing vital protection for their beloved instrument during transport and storage. With a plethora of options available on the market, choosing the right guitar case can be a daunting task.
However, fear not! In this comprehensive guide, we’ll explore everything you need to know about guitar cases, from their history and types to maintenance tips and customization options.
Whether you’re a seasoned musician or a beginner guitarist, this guide will help you make an informed decision and ensure your guitar stays safe and sound wherever you go.
Quick Tips for Choosing the Perfect Guitar Case
- Determine the type of protection you need: Consider factors such as durability, portability, and level of protection required for your guitar.
- Measure your guitar: Ensure compatibility by measuring your guitar’s dimensions and comparing them to the case’s interior dimensions.
- Set a budget: Determine how much you’re willing to spend on a guitar case and prioritize features based on your budget.
- Check for additional features: Look for features like padded interiors, storage compartments, and adjustable straps for added convenience.
- Consider customization options: Explore options for custom-fit cases or personalized designs to add a unique touch to your guitar case.
The Complete Guide to Guitar Cases
-
History of Guitar Cases
Guitar cases have evolved significantly over the years, adapting to the changing needs and preferences of musicians. Originally, guitar cases were simple cloth or leather bags designed to protect guitars from dust and minor scratches.
However, as guitars became more valuable and fragile, the need for more robust protection arose, leading to the development of hardshell cases made from materials like wood, fiberglass, and plastic. Today, guitar cases come in various shapes, sizes, and materials, catering to the diverse needs of guitarists around the world.
-
Types of Guitar Cases
There are three main types of guitar cases: hardshell cases, soft cases (gig bags), and hybrid cases. Each type offers distinct advantages and disadvantages, depending on factors such as durability, weight, and level of protection.
-
Hardshell Cases
Hardshell cases are known for their robust construction and excellent protection against impacts and accidents. Typically made from materials like plywood, ABS plastic, or fiberglass, these cases feature a rigid outer shell lined with plush padding to cushion the guitar against bumps and shocks.
While hardshell cases offer superior protection, they tend to be heavier and bulkier than other types of cases, making them less ideal for travel.
-
Soft Cases (Gig Bags)
Soft cases, also known as gig bags, are lightweight and portable options favored by musicians who value convenience and ease of transportation. Constructed from durable fabrics like nylon or canvas, gig bags offer decent protection against minor bumps and scratches while providing ample storage space for accessories like picks, cables, and sheet music.
However, soft cases may not offer the same level of protection as hardshell cases and are more susceptible to damage from rough handling or accidents.
-
Hybrid Cases
Hybrid cases combine the best of both worlds, offering the durability of hardshell cases with the lightweight portability of soft cases. These cases typically feature a rigid outer shell made from materials like ABS plastic or polycarbonate, combined with padded interiors and reinforced edges for added protection.
Hybrid cases strike a balance between protection and convenience, making them an excellent choice for musicians who require reliable protection without sacrificing portability.
III. Factors to Consider When Choosing a Guitar Case
When selecting a guitar case, several factors should be taken into account to ensure the best possible protection for your instrument. These factors include:
- Instrument type and size compatibility: Make sure the case is designed to accommodate your specific type of guitar, whether it’s an acoustic, electric, or bass guitar.
- Level of protection needed: Consider how you’ll be using the case and the level of protection required for your guitar. If you’re traveling frequently or playing gigs in different venues, you’ll need a case that can withstand rough handling and protect your guitar from damage.
- Portability and weight: Evaluate the weight and portability of the case, especially if you’ll be carrying it long distances or traveling by public transportation.
- Budget considerations: Set a budget for your guitar case purchase and prioritize features based on your budget constraints. While higher-priced cases may offer additional features and better protection, there are plenty of affordable options available that provide adequate protection for your guitar.
- Additional features: Look for features like padded interiors, storage compartments, and adjustable straps for added convenience and functionality.
Importance of Guitar Cases
Guitar cases play a crucial role in protecting your instrument from physical damage, environmental factors, and theft. By investing in a high-quality guitar case, you can ensure your guitar remains safe and secure wherever you go. Here are some key reasons why guitar cases are essential:
- Protection from physical damage: Guitar cases provide a protective barrier against bumps, drops, and other accidents that can cause damage to your instrument.
- Protection from environmental factors: Guitar cases help shield your guitar from fluctuations in temperature and humidity, which can cause warping, cracking, or other damage to the wood and electronics.
- Transport convenience and ease: Guitar cases make it easy to transport your instrument to gigs, rehearsals, or lessons, providing a secure and comfortable carrying solution.
- Care and Maintenance of Guitar Cases
To ensure your guitar case remains in good condition and continues to provide reliable protection for your instrument, proper care and maintenance are essential. Here are some tips for keeping your guitar case clean and well-maintained:
- Regularly clean the exterior of the case with a damp cloth to remove dust, dirt, and grime.
- Inspect the interior of the case for any signs of wear or damage, such as loose stitching or worn padding, and repair or replace as needed.
- Avoid exposing your guitar case to extreme temperatures or humidity levels, as this can cause damage to the materials and compromise the protection of your instrument.
- Store your guitar case in a cool, dry place away from direct sunlight and moisture to prevent mold and mildew growth.
- Periodically check the zippers, handles, and other hardware for signs of wear or damage and lubricate as needed to ensure smooth operation.
By following these simple care and maintenance tips, you can prolong the life of your guitar case and ensure it continues to provide reliable protection for your instrument for years to come.
- Customization and Personalization Options
While functionality and protection are paramount when choosing a guitar case, many musicians also appreciate the opportunity to personalize their case to reflect their unique style and personality. Here are some customization options to consider:
- Custom-fit cases: Some manufacturers offer custom-fit cases designed to perfectly accommodate your specific type and size of guitar, ensuring a snug and secure fit.
- Personalized designs: Many guitar case manufacturers offer the option to customize the exterior of your case with personalized designs, graphics, or logos, allowing you to add a personal touch to your instrument’s protection.
Whether you prefer a sleek and professional look or want to make a bold statement with your guitar case, there are plenty of customization options available to suit your individual tastes and preferences.
Table of Accessories for Guitar Cases
| Accessory | Description | Price |
| Guitar Straps | Comfortable straps for easier transportation | $15 – $50 |
| Humidifiers | Regulate humidity levels within the case | $10 – $30 |
| Case Covers | Additional protection against scratches | $20 – $50 |
| Security Locks | Prevent theft or unauthorized access | $10 – $20 |
| Replacement Parts | Handles, latches, or hinges for case repair | $5 – $20 |
| Insurance Coverage | Protect against loss, theft, or damage | Varies |
These accessories complement your guitar case and ensure maximum protection and convenience for your instrument. Choose the ones that best fit your needs and budget to enhance your guitar-playing experience.
Conclusion
In conclusion, a guitar case is an essential accessory for any guitarist, providing vital protection for their instrument and ensuring it remains safe and secure wherever they go. By understanding the different types of guitar cases available, considering factors like compatibility, protection level, and portability, and following proper care and maintenance practices, you can choose the perfect guitar case to suit your needs and keep your instrument safe for years to come.
Easy Ways To Play the F Chord With No Barre
Introduction
Ok so you`ve started learning the guitar and all is well in the world, you`ve learnt a few songs you`re sounding pretty slick and your friends think you`re awesome.
Only now you`ve decided it`s time to learn your favorite song of all time but what’s this F major barre chord ????? grrrrrrrrrrrrrrrraaahhhhhh.
Do not despair you’ve struggled I struggled my grandma struggled and even her grandma struggled, ok I`m exaggerating my great great grandma was a real shredder but my point is its a cross well all have to bare in the beginning and a stumbling block that can halt people in their tracks, some even give up.
Although at some point you are going to bite the bullet and tackle the barre chord head as its uses are endless and invaluable in some cases at this point we`re going to kick the can down the road for another day.
So why do we need to learn the F Barre Chord
So what’s the big deal with the F chord ? Well F is the root of F major chord followed by A the major third and C the perfect 5th.
F is found in several major and minor keys in the key of F Major it’s the i note the key of C its the iV and in the key of B flat its the V note.
Major Scales
I ii iii IV V Vi Vii
C D E F G A B
F G A Bb C D E
Bb C D Eb F G A
Minor Scales
I ii iii IV V Vi Vii
Dm E F Gm Am Bb C
Am B C Dm Em F G
Gm A Bb Cm Dm Em F
The scales that are listed above all contain F and are some of the most popular scales in modern music for artists to write songs in rock, pop, country and everything in between.
The cold hard fact is if you`re learning guitar the F chord is gonna hunt you down quicker than Liam Neeson in Taken but there’s no need to fear we have some cheats to combat things.
So why is the F barre Chord hard for beginners.
The reason simply is that for beginners it’s a massive stretch, you’re asking your fingers to perform something totally foreign, it’s like doing anything physical in sports.
At first you will ache but once you train your muscle memory things will get better.
Another factor that makes the F barre chord even harder is that it’s right at the bottom of the neck, this puts a lot of extra stress on a beginners wrist but with practice this becomes easier over time to the point you do it without thinking.
Here it is the stumbling block for all beginners, the dreaded F Barre chord there`s no wonders we all struggle the pain of the stretch of the index finger with the extra twist of the wrist at the bottom of the next.
With practice this will become so easy you won`t even think about it i promise.
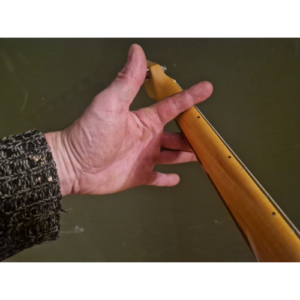
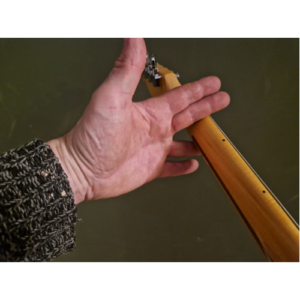
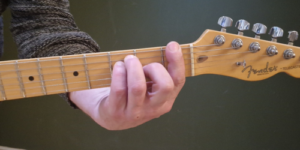
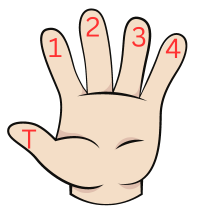
.Quick Tip When I’m training my fingers into a new chord shape, I will push my fingers over the back of the guitar neck until I can feel the stretch. I find this helps train your fingers and still do it today if I`ve not played in a while.
Easy Ways To Play The F Chord
Ok so let`s have a look at some less finger gymnastic ways to plat the F chord.
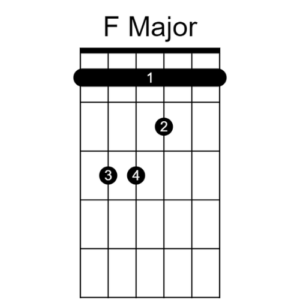
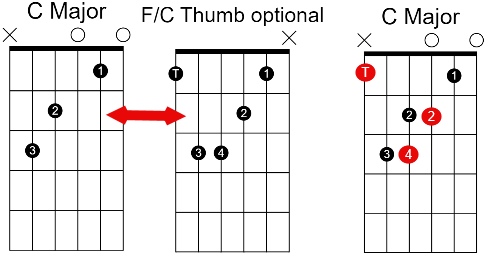
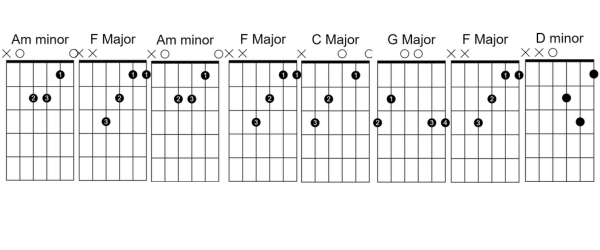
. The first set of chords here are all variations of the F Triad Chord.
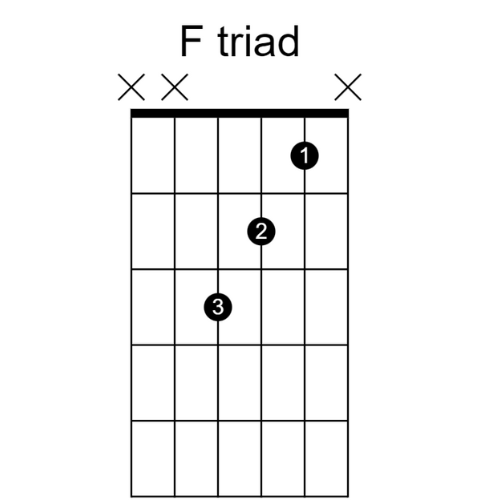
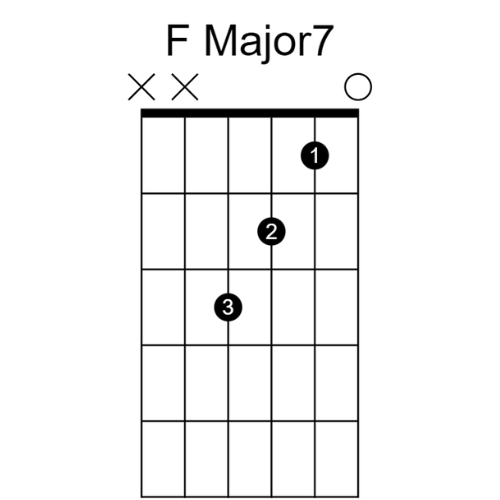
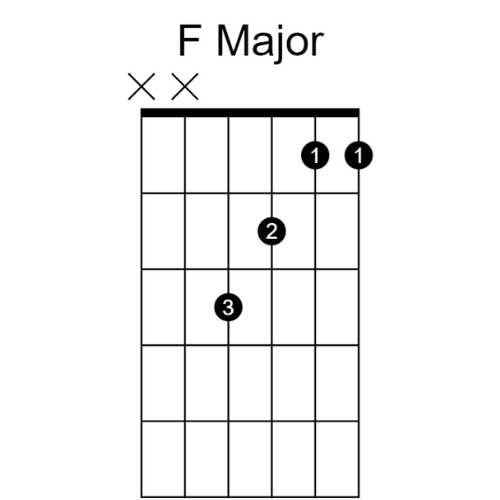

This is the easiest F chord to play all essentially the same apart from a few minor differences the F triad and F Major the only difference being the top E string being pressed with your index finger on the first fret and the Fmajor7 having the top E string being played open.
Be carful not to hit the unfretted strings, In some cases you may find these chords a little thin sounding and not giving you the beef that the F barre chord gives you but this is the place to start.
F/C Thumb optional
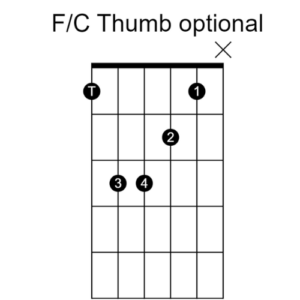
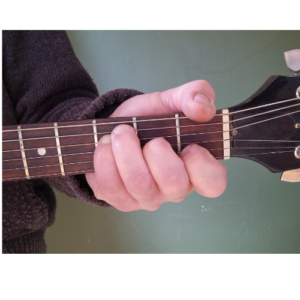
This is by far my favorite f chord probably one of my favorite chords when ever i want an easy deep bassey F chord particularly when playing acoustic, this is far deeper sounding than the triad chords once you`re more more confident with this you can try putting your thumb on the first fret bottom E string.
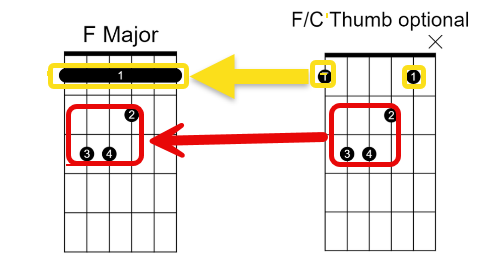
The keen eyed amongst you will notice that this chord with the thumb is the same fretted notes as the F Barre chord but with out the index finger torture of barring the first fret.
Simple F chord Exercises
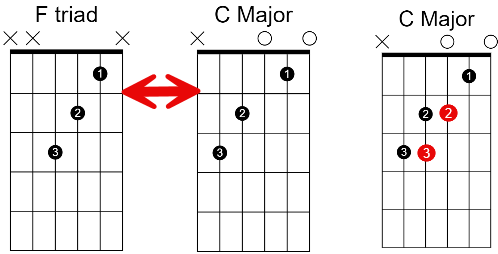
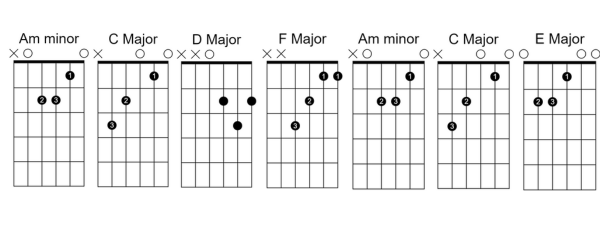
This first simple exercise is just switching between F triad and C Major, this is a good starting point as you keep your first finger fretted on this first fret of the B string while only moving your 2nd and 3rd fingers up and down a string.
A added bonus to this exercise is you are also well on your way to learning John Lennon`s Imagine and Half the world away by Oasis.
This second exercise is switching between the F/C chord and C Major in this exercise you simply have to alternate placing your forth finger on the forth fret of the D string and moving your second finger from the second fret of the D string to the second fret of the G string.
Start of slowly and gradually build up you speed un till your fingers are comfortable then you can start to add more chords to you practice.
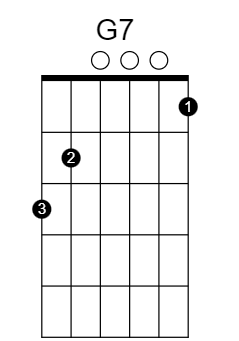
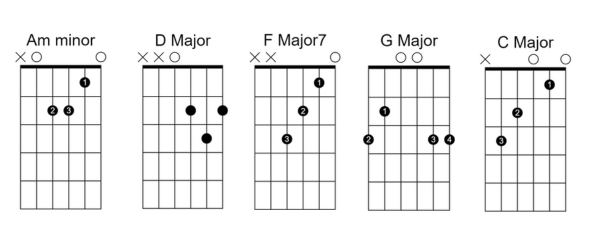
A good chord to first introduce would be the G7 as you would not be changing the shape of the 2nd and 3rd fingers just dropping them down a string and the progression of F C G is found in countless songs.
Songs That Use The F Chord
.The Passenger By Iggy Pop
.Half the World Away By Oasis
.Californication By The Red Hot Chili Peppers
.House of The Rising Sun By The Animals
.One By U2
The great thing about these songs is they`re all the same chords so if you learn one you can play them all.
Other Resources
Here are some other resource ideas helping you on your quest to learn the F chord prices will vairy.
| Resource Type | Description | Pros | Cons | Rough Cost |
|---|---|---|---|---|
| Online Video Tutorials | Free and paid tutorials available on platforms like YouTube or Udemy. | Accessible, flexible schedule, visual learning. | Quality varies, no personal feedback. | Free to $100 for courses |
| Guitar Learning Apps | Interactive apps like Yousician, Fret Trainer. | Interactive, gamified learning, immediate feedback. | Subscription cost, less personalized. | Free to $20/month |
| Books and Print Materials | Guitar chord books and instructional guides. | Comprehensive, portable. | No audio or visual aids, static content. | $10 to $50 |
| Private Guitar Lessons | One-on-one instruction with a professional teacher. | Personalized feedback, tailored lessons. | Higher cost, scheduling requirements. | $30 to $100 per hour |
| Group Workshops or Classes | Learning in a group setting, often available at music schools. | Social interaction, lower cost than private. | Less individual attention. | $100 to $300 for a series |
| Online Forums and Communities | Platforms like Reddit or specialized guitar forums. | Free, supportive community, diverse perspectives. | No structured learning, quality varies. | Free |
Conclusion
So you`ve made it this far you`re not going to let the dreaded F chord hold you back and with these simplified chords and exercises it won`t.
Just be patient and take your time practicing the exercises above and do the light finger stretches. Start off slowly and gradually work up your speed until you can switch comfortably, don`t get frustrated, take a break if you need it.
Once you feel confident start adding other chords, you can even learn the songs I’ve suggested, just follow these steps and I promise you will soon be playing the F without even thinking about it.
We can’t neglect the F Barre chord. We will have to face it sometime because of its importance but for now this will keep you inspired and your progress moving.
YOU`VE GOT THIS !
The Essential Guide to Gig Bags: Protecting Your Instruments on the Go
Introduction:
Whether you’re a seasoned musician or just starting out, one thing is certain: protecting your instruments is paramount. Gig bags are a musician’s best friend when it comes to transporting their gear safely and conveniently. In this comprehensive guide, we’ll delve into everything you need to know about gig bags, from understanding their importance to choosing the right one for your needs. Whether you’re a guitarist, bassist, keyboardist, or drummer, a high-quality gig bag is essential for keeping your instrument safe on the road. Let’s dive in!
Quick Tips for Choosing the Right Gig Bag:
- Assess Your Needs: Consider the size and shape of your instrument, as well as your budget and specific requirements.
- Prioritize Protection: Look for gig bags with ample padding and interior protection to safeguard your instrument from bumps and scratches.
- Focus on Comfort: Opt for gig bags with comfortable straps and handles for easy carrying, especially if you’ll be traveling long distances.
- Check for Storage Options: Ensure the gig bag has enough pockets and compartments to store accessories like cables, picks, and sheet music.
- Read Reviews: Take the time to read customer reviews and seek recommendations from fellow musicians to make an informed decision.
-
Types of Gig Bags:
When it comes to gig bags, there’s no one-size-fits-all solution. Here are the main types to consider:
-
Instrument-Specific Gig Bags:
- Guitar Gig Bags: Designed to fit acoustic, electric, or bass guitars, these gig bags offer specialized protection tailored to the shape and size of your instrument.
- Bass Gig Bags: Similar to guitar gig bags but with extra padding and reinforcement to accommodate the larger size and weight of bass guitars.
- Keyboard Gig Bags: Ideal for transporting keyboards and digital pianos, these gig bags often feature adjustable straps and padded interiors for added protection.
- Drum Gig Bags: Drummers can benefit from gig bags designed specifically for drums, including individual bags for snare drums, tom-toms, and cymbals.
- Multi-Purpose Gig Bags:
- Backpack-Style Gig Bags: Perfect for musicians on the go, these gig bags double as backpacks, allowing you to carry your instrument comfortably on your back.
- Hybrid Gig Bags: Combining the portability of gig bags with the protection of hard cases, hybrid gig bags offer the best of both worlds.
- Universal Gig Bags: Versatile and adaptable, universal gig bags can accommodate a wide range of instruments, making them ideal for musicians with multiple instruments or unconventional shapes.
-
Features to Consider:
When choosing a gig bag, it’s essential to pay attention to the following features:
-
Material and Durability:
- Common materials used in gig bags include nylon, polyester, and canvas, each offering varying levels of durability and weather resistance.
- Look for gig bags with reinforced stitching and quality zippers to ensure longevity and reliability.
- Padding and Protection:
- Adequate padding is crucial for protecting your instrument from impacts and vibrations during transport.
- Consider gig bags with thick foam padding or molded interiors for maximum protection against bumps and knocks.
- Portability and Comfort:
- Opt for gig bags with padded shoulder straps and ergonomic handles for comfortable carrying, especially if you’ll be traveling long distances.
- Lightweight gig bags are ideal for musicians who need to carry their instruments for extended periods without straining their shoulders or back.
- Storage and Organization:
- Look for gig bags with multiple pockets and compartments to store accessories like cables, pedals, and music stands.
- Some gig bags feature built-in organizers and removable pouches for added convenience and versatility.
- Weather Resistance:
- If you’ll be traveling outdoors or in inclement weather, choose a gig bag with water-resistant or waterproof materials to protect your instrument from moisture and humidity.
- Consider gig bags with padded covers or rain flies for added protection against rain, snow, and extreme temperatures.
III. Choosing the Right Gig Bag:
Selecting the perfect gig bag requires careful consideration of your individual needs and preferences:
- Assessing Individual Needs:
- Consider factors such as the size and weight of your instrument, the frequency of travel, and your budget when choosing a gig bag.
- Think about any specific requirements you may have, such as extra storage space for accessories or reinforced padding for added protection.
- Considering Instrument Size and Shape:
- Ensure the gig bag is the right size and shape for your instrument, with enough room to accommodate any protruding knobs, tuners, or accessories.
- Measure your instrument carefully and compare it to the dimensions of the gig bag to ensure a proper fit.
-
Budget Considerations:
- Set a budget for your gig bag purchase and prioritize features based on your needs and preferences.
- Remember that investing in a high-quality gig bag is essential for protecting your instrument and ensuring its longevity, so it’s worth splurging on a durable and well-made bag.
- Reading Reviews and Seeking Recommendations:
- Take the time to read customer reviews and testimonials to gauge the quality and reliability of different gig bags.
- Reach out to fellow musicians, teachers, or industry professionals for recommendations and advice on choosing the right gig bag for your needs.
- Maintenance and Care:
Once you’ve chosen the perfect gig bag, it’s essential to take care of it properly to ensure years of reliable service:
- Cleaning Instructions:
- Follow the manufacturer’s guidelines for cleaning and maintaining your gig bag, including spot cleaning with mild soap and water as needed.
- Avoid using harsh chemicals or abrasive cleaners that could damage the fabric or padding of the gig bag.
- Storage Tips:
- When not in use, store your gig bag in a cool, dry place away from direct sunlight and moisture to prevent mold and mildew growth.
- Consider investing in a gig bag storage rack or hanging system to keep your bags organized and easily accessible.
- Repair and Maintenance Advice:
- Regularly inspect your gig bag for signs of wear and tear, such as frayed stitching or damaged zippers, and repair any issues promptly to prevent further damage.
- Consider investing in a gig bag repair kit or contacting a professional repair service for more extensive repairs or modifications.
- Innovation and Trends:
The world of gig bags is constantly evolving, with new technologies and trends emerging to meet the needs of modern musicians:
- Recent Advancements in Gig Bag Technology:
- From advanced padding materials to innovative storage solutions, gig bag manufacturers are constantly pushing the boundaries of design and functionality.
- Look for gig bags with built-in features like GPS tracking, RFID tags, and Bluetooth connectivity for added security and convenience.
- Sustainable Materials and Eco-Friendly Options:
- As environmental concerns continue to grow, many gig bag manufacturers are exploring sustainable materials and production methods to reduce their carbon footprint.
- Consider choosing gig bags made from recycled or biodegradable materials, or opt for brands that prioritize eco-friendly practices and initiatives.
- Customization and Personalization Trends:
- Personalization is a growing trend in the gig bag industry, with many manufacturers offering custom embroidery, color options, and branding opportunities for musicians looking to add a personal touch to their gear.
- Consider investing in a custom gig bag with your band logo or name embroidered on the front for a unique and professional look.
- Case Studies and Expert Advice:
To provide real-world insights into the world of gig bags, we spoke with experienced musicians and industry professionals:
Table of Things You Can Purchase with Prices for Gig Bag:
| Product Name | Description | Price |
| Fender Deluxe Gig Bag | Padded gig bag for electric guitars | $49.99 |
| Gator Pro-Go Series Keyboard Gig Bag | Heavy-duty gig bag for keyboards and digital pianos | $99.99 |
| SKB Drum Gig Bag Set | Set of gig bags for snare drum, tom-toms, and cymbals | $199.99 |
| Mono M80 Dual Electric Bass Gig Bag | Hybrid gig bag with dual compartments for two bass guitars | $249.99 |
| Protec Contoured Alto Saxophone Gig Bag | Contoured gig bag for alto saxophones with adjustable shoulder straps | $79.99 |
Prices may vary depending on the retailer and location.
With a variety of gig bags available to suit every instrument and budget, there’s no excuse for leaving your gear unprotected. Invest in a quality gig bag today and enjoy peace of mind knowing your instruments are safe and secure wherever your music takes you.
Conclusion:
In conclusion, gig bags are an essential accessory for any musician looking to protect their instruments on the go. By understanding the different types of gig bags available, prioritizing features like padding and protection, and following maintenance and care tips, you can ensure your instrument stays safe and secure wherever your music takes you. Whether you’re a professional touring musician or a casual hobbyist, investing in a high-quality gig bag is a decision you won’t regret.
A Detailed Look At The Fender Rumble 40
Introduction
As a bass player, the amplifier you choose can profoundly impact your sound, performance, and overall musical experience. Among the plethora of options available in the market, the Fender Rumble 40 stands out as a versatile and reliable choice for both beginners and seasoned professionals alike. In this article, we’ll take an in-depth look at the Fender Rumble 40 bass amplifier, exploring its features, sound quality, user experience, and how it compares to other options on the market.
Quick Tips for Choosing the Right Bass Amplifier:
- Consider your needs: Think about the venues you’ll be playing in, the style of music you perform, and your budget when selecting an amplifier.
- Look for versatility: Choose an amplifier that offers a wide range of tone-shaping options to accommodate different musical genres and playing styles.
- Check the power and volume: Ensure that the amplifier has sufficient power and volume output to suit your performance needs, whether it’s for rehearsals, gigs, or studio sessions.
- Read user reviews: Take the time to read reviews and testimonials from other bass players to get insights into the amplifier’s performance, reliability, and overall user experience.
Now, let’s delve into our detailed review of the Fender Rumble 40 bass amplifier.
Overview of the Fender Rumble 40
The Fender Rumble 40 is a compact yet powerful bass amplifier that packs a punch in a lightweight and portable package. With 40 watts of power driving a single 10-inch speaker, this amplifier delivers a rich and full-bodied bass tone that is suitable for a variety of musical styles. Its sleek design and durable construction make it a perfect choice for rehearsals, small gigs, and studio recordings.
Technical Specifications:
- Power: 40 watts
- Speaker: 10-inch Fender Special Design speaker
- Weight: 18.5 lbs (8.4 kg)
- Dimensions: 16.5″ H x 16.5″ W x 12″ D (41.91 cm x 41.91 cm x 30.48 cm)
- Controls: Gain, Bass, Mid, Treble, Master Volume, Aux Input, Headphone Output
Key Features:
- Versatile tone-shaping controls allow you to dial in your desired sound with precision.
- The built-in overdrive circuit adds grit and punch to your tone for added versatility.
- Auxiliary input and headphone output for practicing along with your favorite tracks or silently rehearsing.
- Its lightweight and portable design makes it easy to transport to gigs, rehearsals, or jam sessions.
Sound Quality and Performance
One of the standout features of the Fender Rumble 40 is its impressive sound quality and performance. Despite its compact size, this amplifier delivers a deep and punchy bass response with clarity and definition across the frequency spectrum. Whether you’re laying down a solid groove, slapping and popping, or playing with a pick, the Fender Rumble 40 handles it all with finesse.
The versatile tone shaping controls allow you to sculpt your sound to perfection, whether you prefer a deep and boomy low end, a tight and focused midrange, or crisp and articulate highs. The built-in overdrive circuit adds a touch of grit and distortion to your tone, giving you added flexibility to dial in anything from subtle warmth to a full-on growl.
In terms of performance, the Fender Rumble 40 excels in a variety of settings. Its 40-watt power output is more than enough for rehearsals, small gigs, and studio recordings, while its compact and lightweight design makes it easy to transport from gig to gig. Whether you’re playing in a cramped rehearsal space or on a crowded stage, the Fender Rumble 40 delivers consistent and reliable performance every time.
User Experience
One of the things that sets the Fender Rumble 40 apart from other bass amplifiers is its user-friendly design and intuitive controls. Setting up the amplifier is a breeze, thanks to its simple layout and clearly labeled controls. Whether you’re a seasoned pro or a beginner, you’ll have no trouble dialing in your desired sound in no time.
The lightweight and portable design of the Fender Rumble 40 makes it a perfect choice for bass players on the go. Whether you’re traveling to gigs, rehearsals, or jam sessions, you can easily carry the amplifier with one hand thanks to its convenient carrying handle. The rugged construction ensures that it can withstand the rigors of the road, while the stylish design adds a touch of class to any stage setup.
Comparison with Alternatives
While the Fender Rumble 40 is undoubtedly a top contender in its price range, it’s essential to consider how it stacks up against other bass amplifiers on the market. Here’s a brief comparison with some popular alternatives:
- The Ampeg BA-108 offers similar power and features to the Fender Rumble 40 but with a slightly different tone profile. While the Fender Rumble 40 leans towards a more modern and versatile sound, the Ampeg BA-108 has a classic Ampeg tone with a warm and vintage character.
- Orange Crush Bass 25: The Orange Crush Bass 25 is another compact and portable bass amplifier with 25 watts of power and an 8-inch speaker. While it may not pack as much punch as the Fender Rumble 40, it offers a unique tone with Orange’s signature growl and grit.
- Hartke HD25: The Hartke HD25 is a compact and lightweight bass amplifier with 25 watts of power and an 8-inch speaker. It offers a versatile tone-shaping control with a 3-band EQ and built-in limiter for added versatility and control.
Ultimately, the choice between these amplifiers will depend on your personal preferences, playing style, and budget. It’s essential to try out different amplifiers and see which one best suits your needs and tastes.
Pros and Cons
Pros:
- Versatile tone-shaping controls
- Built-in overdrive circuit for added flexibility
- Lightweight and portable design
- Affordable price point
Cons:
- Limited power output for larger venues
- Lack of built-in effects or onboard tuner
Recommendations
Overall, the Fender Rumble 40 is an excellent choice for bass players looking for a versatile, reliable, and affordable amplifier. Its impressive sound quality, user-friendly design, and portability make it a top contender in its price range. Whether you’re a beginner looking to upgrade your practice setup or a seasoned pro in need of a reliable gigging amp, the Fender Rumble 40 has you covered.
Table of Additional Accessories
| Accessory | Description | Price |
| Fender Professional Series Instrument Cable | 10 ft cable for connecting your bass guitar to the amplifier | $24.99 |
| Fender Pure Vintage ’58 Precision Bass Pickup | Vintage-style pickup for upgrading your bass guitar’s tone | $89.99 |
| Fender Rumble 40 Amplifier Cover | Protective cover to keep your amplifier safe from dust, dirt, and scratches | $19.99 |
| Fender Rumble 40 Footswitch | Footswitch for remotely controlling the amplifier’s overdrive circuit | $39.99 |
These additional accessories can enhance your bass-playing experience and complement your Fender Rumble 40 amplifier.
In conclusion, the Fender Rumble 40 bass amplifier offers an unbeatable combination of performance, versatility, and value for money. Whether you’re practicing at home, jamming with friends, or performing on stage, this amplifier delivers the goods with style and finesse. If you’re in the market for a reliable and affordable bass amplifier, look no further than the Fender Rumble 40.
Unlocking the Melodic World of E Minor Scale: A Comprehensive Guide
Introduction:
In the vast realm of music theory, scales play a pivotal role in shaping melodies, harmonies, and overall musical expression. Among the myriad of scales, the E minor scale stands out for its emotive qualities and versatile applications across various genres.
Whether you’re a budding musician eager to expand your repertoire or a seasoned player looking to deepen your understanding of musical intricacies, exploring the E minor scale can be a rewarding journey.
In this comprehensive guide, we’ll delve into the essence of the E minor scale, uncover its harmonic nuances, explore practical techniques for mastery, and discover its profound impact in both classical compositions and contemporary music.
From understanding its fundamental structure to unleashing creative possibilities, this article aims to equip you with the knowledge and tools to harness the melodic richness of the E minor scale.
Quick Tips for Mastering the E Minor Scale:
- Memorize the scale pattern: Familiarize yourself with the sequence of notes comprising the E minor scale across different octaves.
- Practice with a metronome: Develop precision and rhythmic accuracy by practicing the scale at various tempos with a metronome.
- Experiment with variations: Explore different fingering patterns and positions to enhance dexterity and adaptability.
- Apply in a musical context: Integrate the E minor scale into your practice routines, improvisations, and compositions to grasp its practical significance.
- Listen actively: Study recordings of renowned musicians incorporating the E minor scale in their performances to glean insights into phrasing and expression.
-
Understanding the E Minor Scale
- Definition and structure of the E minor scale: The E minor scale, consisting of the notes E, F♯, G, A, B, C, and D, follows a specific pattern of whole and half steps, resulting in its distinctive sound.
- Notes comprising the E minor scale: Delve into the individual notes within the scale and their respective intervals, highlighting the characteristic minor third interval.
- Comparison with other minor scales: Explore how the E minor scale differs from other minor scales such as natural, harmonic, and melodic minor, noting variations in intervals and tonal qualities.
-
Musical Applications of the E Minor Scale
- Common usage in various music genres: Survey the widespread utilization of the E minor scale across genres including classical, jazz, blues, rock, and folk, showcasing its versatility and adaptability.
- Analysis of famous compositions: Examine iconic pieces from the classical repertoire to contemporary hits that prominently feature the E minor scale, dissecting melodic motifs, chord progressions, and harmonic contexts.
- Exploration of chord progressions: Investigate common chord progressions derived from the E minor scale, such as the classic i-IV-V progression, and their role in shaping musical phrasing and emotional impact.
III. Techniques for Playing the E Minor Scale
- Basic fingerings for different instruments: Provide specific fingerings and positions for playing the E minor scale on instruments like guitar, piano, violin, and flute, catering to diverse instrumentalists.
- Tips for mastering the scale efficiently: Offer practice strategies, including scale exercises, scales in thirds, and scale sequences, to enhance fluency, speed, and accuracy.
- Advanced techniques and variations: Introduce advanced techniques such as modal interchange, chromatic embellishments, and scalar runs, enabling musicians to elevate their improvisations and compositions.
- Modal Interplay and Harmonic Characteristics
- Modal relationships within the E minor scale: Explore modal interchange involving modes derived from the E minor scale, such as Dorian, Phrygian, and Aeolian modes, and their harmonic implications.
- Harmonic characteristics and emotional impact: Examine the emotive qualities inherent in the E minor scale, ranging from melancholic introspection to intense passion, and how harmonic progressions amplify its expressive potential.
- C. Examples of modal interchange: Illustrate instances of modal interchange where chords and melodic elements borrowed from related modes enrich the harmonic palette and add depth to musical compositions.
- Creative Approaches and Composition
- Exploring improvisation: Provide guidance on improvising with the E minor scale, including scale-based improvisation techniques, modal improvisation, and call-and-response improvisational exercises.
- Compositional techniques: Discuss compositional devices such as motif development, modulation, and thematic transformation, demonstrating how to incorporate the E minor scale in original compositions across diverse genres.
- Case studies of innovative compositions: Showcase exemplary compositions that showcase inventive use of the E minor scale, highlighting compositional strategies, harmonic ingenuity, and expressive storytelling.
-
E Minor Scale in Popular Culture
- Instances in film scores and TV soundtracks: Examine the prevalence of the E minor scale in cinematic music, analyzing its role in establishing mood, character themes, and narrative tension.
- Influence on contemporary popular music: Trace the influence of the E minor scale in modern genres such as pop, rock, electronic, and hip-hop, identifying recurring melodic motifs and harmonic progressions.
- Memorable instances in popular songs: Compile a list of iconic songs featuring the E minor scale, from classic ballads to chart-topping hits, and dissect their melodic hooks, chord structures, and lyrical resonance.
Table of Things to Purchase with Prices related to E Minor Scale:
| Product | Description | Price |
| Guitar Scale Book | Comprehensive guide with scale diagrams and exercises | $15.99 |
| Piano Scale Poster | Wall poster featuring E minor scale and fingering positions | $9.99 |
| Violin Scale App | Mobile app with interactive scale exercises and tutorials | Free |
| Music Theory Workbook | Workbook focusing on scales, modes, and harmony | $24.95 |
| Metronome | Digital metronome for practicing scales at various tempos | $19.99 |
| E Minor Scale Sheet Music | Collection of sheet music featuring compositions in E minor | $12.50 |
Conclusion:
Mastering the E minor scale is not merely about acquiring technical proficiency but about unlocking a world of musical expression and creativity. Whether you’re drawn to its haunting melodies, its emotive depth, or its universal resonance, the E minor scale offers endless possibilities for exploration and innovation.
By immersing yourself in its harmonic nuances, experimenting with creative techniques, and embracing its role in shaping musical compositions, you’ll embark on a transformative journey that transcends scales and resonates deeply with the essence of music itself.
So, dive into the melodic tapestry of the E minor scale, and let your musical journey unfold with boundless inspiration and passion
A deep Dive into the Chorus Pedal a Comprehensive guide
Introduction:
Chorus pedals have long been a staple in the arsenal of guitarists and musicians seeking to add depth and dimension to their sound. Whether you’re strumming chords on an acoustic guitar or shredding a solo on an electric, the lush modulation effect of a chorus pedal can transform your tone into something truly captivating.
In this article, we’ll explore everything you need to know about chorus pedals, from how they work to practical tips for using them effectively. Whether you’re a seasoned pro or just getting started, join us on a journey through the world of chorus effects.
Quick Tips for Using Chorus Pedals:
- Experiment with Different Settings: Don’t be afraid to tweak the controls on your chorus pedal to find the perfect sound for your playing style and musical context.
- Layer with Other Effects: Chorus pedals can sound even more dynamic when combined with other effects like delay or reverb. Experiment with different pedal combinations to create unique textures and atmospheres.
- Mind Your Mix: Pay attention to the mix knob on your chorus pedal to balance the intensity of the effect with your dry signal. Too much chorus can muddy your tone, while too little might not have the desired impact.
- Use Sparingly for Clean Tones: When playing clean or slightly distorted tones, a subtle chorus effect can add warmth and richness without overpowering the sound. Start with a low depth and speed setting and adjust to taste.
- Go Bold for Solos: When it’s time to take a solo, crank up the depth and speed on your chorus pedal for a lush, swirling sound that cuts through the mix and grabs the listener’s attention.
Now, let’s dive deeper into the world of chorus pedals and explore their history, functionality, practical applications, and more.
The Evolution of Chorus Pedals:
Chorus effects have been around since the 1960s, initially created by running a signal through multiple tape machines with slight variations in speed. This produced a shimmering, “doubled” effect that mimicked the sound of multiple instruments playing the same part.
Early chorus pedals, such as the Boss CE-1, utilized analog circuitry to achieve a similar modulation effect, albeit with less control over parameters like depth and speed.
The 1980s saw the rise of digital technology, leading to the development of more versatile chorus pedals with programmable presets and a wider range of modulation options. Pedals like the TC Electronic SCF and the Electro-Harmonix Small Clone became popular choices among guitarists, offering rich, expansive chorus tones that could be dialed in with precision.
In recent years, boutique pedal manufacturers have pushed the boundaries of chorus effects even further, offering unique takes on the classic modulation sound. Pedals like the Strymon Mobius and the Walrus Audio Julia combine chorus with other modulation effects like vibrato and flanger, providing players with endless sonic possibilities.
Practical Applications and Usage Tips:
Chorus pedals are incredibly versatile tools that can enhance a wide range of musical styles and genres. Here are some practical tips for using chorus pedals in your playing:
- Clean Tones: Chorus pedals are often used to add warmth and depth to clean guitar tones, particularly in genres like jazz and pop. Experiment with lower depth and speed settings to create a subtle, shimmering effect that complements your playing without overpowering it.
- Distorted Tones: While chorus pedals are typically associated with clean guitar tones, they can also be used to great effect with overdriven and distorted sounds. Try adding a touch of chorus to your lead lines or power chords to create a sense of movement and dimension.
- Arpeggios and Fingerpicking: Chorus pedals can be particularly effective when playing arpeggiated chords or intricate fingerpicked patterns. The swirling modulation effect can help to smooth out any inconsistencies in your playing and add a sense of cohesion to your sound.
- Layering and Texture: Experiment with stacking multiple chorus pedals or combining chorus with other effects like delay and reverb to create lush, atmospheric textures. This can be especially effective in ambient music or soundtrack-style compositions.
- Soloing: When it’s time to take a solo, don’t be afraid to crank up the intensity on your chorus pedal for a more dramatic effect. Higher depth and speed settings can add a sense of movement and excitement to your lead lines, helping them to stand out in the mix.
DIY and Customization
For those looking to dive deeper into the world of chorus effects, building or modifying your own chorus pedal can be a rewarding experience. There are countless resources available online for DIY enthusiasts, including schematics, tutorials, and forums where you can connect with other builders and share tips and tricks.
If you’re not ready to tackle a full DIY project, many pedal manufacturers offer customizable options that allow you to tailor the sound and functionality of your chorus pedal to suit your specific needs.
Whether you’re looking for a vintage-inspired analog chorus or a cutting-edge digital model with programmable presets, there’s a chorus pedal out there that’s perfect for you.
Table of Chorus Pedal Options and Prices:
| Brand | Model | Price (USD) |
| Boss | CE-2W Chorus | $199 |
| TC Electronic | Corona Chorus | $129 |
| Electro-Harmonix | Small Clone | $99 |
| Strymon | Mobius | $449 |
| Walrus Audio | Julia | $199 |
(Note: Prices may vary depending on retailer and location.)
Conclusion:
Chorus pedals have been a staple of the guitar effects world for decades, and for good reason. From their humble beginnings as analog tape-based effects to the sophisticated digital pedals of today, chorus effects continue to captivate and inspire musicians around the world.
Whether you’re looking to add depth and dimension to your clean tones or create swirling, psychedelic textures for your solos, a chorus pedal is an essential tool for any guitarist’s arsenal. So go ahead, plug in, and let the waves of modulation carry you away to new sonic heights.
Electric vs. Acoustic Guitar: Making the Right Choice
Introduction
When it comes to choosing a guitar, whether you’re a seasoned musician or a beginner, the decision between electric and acoustic is a crucial one. Each type has its own unique characteristics, sound qualities, and playing experiences. Understanding the differences between them can help you make the right choice that aligns with your musical preferences, playing style, and budget.
In this comprehensive guide, we’ll explore the key distinctions between electric and acoustic guitars, covering everything from sound characteristics to playability, portability, cost considerations, versatility, and more. Whether you’re looking for your first guitar or considering adding a new instrument to your collection, this article will provide you with valuable insights to inform your decision-making process.
Quick Tips
- Consider Your Musical Style: Think about the genres of music you enjoy playing or aspire to play. Electric guitars are often preferred for rock, blues, and metal, while acoustic guitars excel in folk, country, and singer-songwriter genres.
- Test Drive Before Buying: If possible, visit a music store and try out both electric and acoustic guitars to get a feel for their sound, playability, and comfort. Don’t rush your decision; take your time to find the right fit.
- Budget Wisely: Evaluate your budget and consider not only the initial cost of the guitar but also any additional expenses for accessories, amplifiers, maintenance, and upgrades.
- Think About Practicality: Think about where and how you’ll be playing the guitar. If you anticipate traveling frequently or performing in different settings, consider the portability and convenience of each type of guitar.
Now, let’s delve into the detailed comparison between electric and acoustic guitars.
Sound Characteristics
Electric Guitar
Electric guitars produce sound through pickups, which convert string vibrations into electrical signals that are then amplified through an amplifier. This setup allows for a wide range of tones and effects, thanks to the versatility of different pickup types, amplifier settings, and effects pedals. From clean tones to distorted crunch and everything in between, electric guitars offer immense flexibility in shaping your sound.
Acoustic Guitar
Acoustic guitars produce sound acoustically, with the vibration of the strings resonating through the soundboard and body of the guitar. This natural resonance results in a warm, rich tone with excellent projection and sustain. While acoustic guitars may lack the versatility of electric guitars in terms of effects and tonal variation, their pure, unadulterated sound is perfect for intimate performances and unplugged settings.
Playability
Electric Guitar
Electric guitars are typically easier to play for beginners due to their narrower necks, lower string action, and lighter gauge strings. The lower string tension also makes it easier on the fingers, allowing for faster fretting and smoother chord changes. The slim profile of electric guitars can be particularly comfortable for players with smaller hands.
Acoustic Guitar
Acoustic guitars often have wider necks and higher string action compared to electric guitars. The heavier gauge strings and higher string tension require more finger strength and dexterity, making them slightly more challenging for beginners. However, many players appreciate the tactile feel and organic response of acoustic guitars, which can enhance their playing experience over time.
Portability and Convenience
Electric Guitar
Electric guitars are generally more compact and lightweight compared to acoustic guitars, making them easier to transport and maneuver. However, electric guitars require amplification to produce sound, which means you’ll need to carry an amplifier and possibly other accessories such as cables and effects pedals. While this setup offers more control over your sound, it can be less convenient for spontaneous jam sessions or playing on the go.
Acoustic Guitar
Acoustic guitars are self-contained instruments, requiring no amplification to produce sound. This makes them more convenient for impromptu performances, outdoor gatherings, or situations where amplification may not be available. However, acoustic guitars are bulkier and heavier than electric guitars, which can make them less practical for travel or extended periods of playing.
Cost Considerations
Electric Guitar
The initial cost of an electric guitar can vary widely depending on factors such as brand, quality, and features. In addition to the guitar itself, you’ll need to budget for an amplifier, cables, and possibly effects pedals. While entry-level electric guitars can be relatively affordable, high-end models and boutique gear can quickly escalate the overall cost.
Acoustic Guitar
Acoustic guitars tend to be more budget-friendly compared to electric guitars, especially at the entry level. You can find quality acoustic guitars at reasonable prices, with fewer additional expenses for amplification and accessories. While there are certainly high-end acoustic guitars available at premium prices, the overall cost of ownership may be lower compared to electric guitars.
Versatility and Musical Styles
Electric Guitar
Electric guitars are incredibly versatile instruments, suitable for a wide range of musical styles including rock, blues, jazz, funk, metal, and more. Their ability to produce a variety of tones and effects makes them a favorite among experimental and creative musicians who enjoy pushing the boundaries of sound. Whether you’re shredding solos, laying down rhythm tracks, or exploring ambient textures, electric guitars offer limitless possibilities for musical expression.
Acoustic Guitar
Acoustic guitars have a timeless appeal and are well-suited to traditional genres such as folk, country, bluegrass, and singer-songwriter music. Their natural, resonant tone lends itself beautifully to fingerpicking, strumming, and intricate chord progressions. Acoustic guitars are also popular for intimate performances, coffeehouse gigs, and storytelling through song. While they may not offer the same level of sonic versatility as electric guitars, acoustic instruments have a charm and simplicity that resonate with many players.
Table of Guitar Accessories and Prices
| Accessory | Electric Guitar | Acoustic Guitar |
| Amplifier | $100 – $1000+ | Not Required |
| Effects Pedals | $50 – $500+ | Not Required |
| Guitar Case | $50 – $200+ | $50 – $150+ |
| Guitar Strings | $5 – $20+ | $5 – $20+ |
| Tuner | $10 – $50+ | $10 – $50+ |
| Guitar Stand | $10 – $50+ | $10 – $50+ |
Note: Prices are approximate and may vary depending on brand, quality, and retailer.
This comprehensive comparison between electric and acoustic guitars aims to provide you with valuable insights to guide your decision-making process. Whether you’re a beginner embarking on your musical journey or an experienced player looking to expand your sonic palette, we hope this article has equipped you with the knowledge and confidence to choose the perfect guitar for your needs.
Conclusion
In conclusion, the choice between electric and acoustic guitars ultimately comes down to personal preference, playing style, and musical goals. Both types of guitars have their own unique qualities and advantages, and there is no right or wrong answer. Whether you’re drawn to the versatility and modern appeal of electric guitars or the timeless charm and acoustic warmth of acoustic guitars, the most important thing is to find an instrument that inspires you to play and create music.
Take your time to explore your options, test out different guitars, and consider factors such as sound characteristics, playability, portability, cost, and versatility. Whether you’re strumming chords around the campfire, rocking out on stage, or recording in the studio, the guitar you choose should feel like an extension of your musical identity and bring you joy every time you pick it up to play.
Happy strumming!